
Dental tray setup provides an area-specific for instruments, and it comes in different designs for various procedures, e.g. composite tray set-up, operative tray, and dental hygiene tray.
Basic Dental tray setup
- 2×2 Gauzes: Absorbent cloth, aid in homeostasis, clean instruments, used in all aspects of dentistry
- Cotton Rolls: It is used to isolate teeth and absorb saliva. Also, it acts as a protective tissue barrier; aid in endodontic diagnostics
- Mouth mirror: It is used to provide indirect vision and To retract lips, cheeks, and tongue. Also, you can use it to reflect light into the mouth
- Explorer: It is used to examine teeth for decay (caries), calculus, furcation, or canals and other anomalies
- Cotton Forcep: It is used to Grasp and/or transfer material in and out of the oral cavity.
Dental composite fillings are becoming more popular this day because it matches the tooth natural colour and band directly to the tooth. Also, dentists use it for the front tooth for aesthetic reasons. Composite resins or tooth-coloured fillings can withstand the pressure of chewing
Composites are very costly than amalgam and are not covered by most insurance plans. Although, no dental filling lasts for a lifetime. Dental association confirms that Amalgam lasts longer than composite fillings.

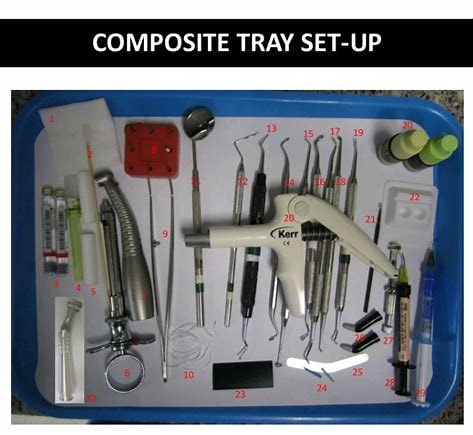
COMPOSITE TRAY SET-UP
- 2×2 Gauzes
- Topical Anesthetic
- Anaesthetic capsules
- Needle
- Cotton Rolls
- Syringe
- High-Speed Handpiece
- Restorative Bur Block
- Cotton Forcep
- Floss
- Hand Mirror
- Perioprobe
- Spoon Excavator
- Acorn Burnisher
- Ball/ Football Burnisher
- Condenser
- Plastic Instrument
- Discoid-Cleoid Carver
- Beavertail Carver
- Bonding Agents
- Microbrush
- Mixing Well
- Articulating Paper
- Wooden Wedges
- Matrix Band
- Packable Composite
- Tofflemire
- Flowable Composite
- Etch
- Slow speed
RESTORATIVE BUR BLOCK
- Diamond football
- Round Bur
- Latch Round Bur
- Diamond Round-nosed
- white stone
- 330
- 557
- Diamond Tree Top
DENTAL TRAY SETUP FOR COMPOSITE PROCEDURE
- Put the topical anaesthetic and cotton rolls and cotton forceps on the dental tray, along with your syringe and needle for numbing the patient.
- Arrange the rubber dam, punch, frame, clamp, forceps, scissors, and floss on the tray (the rubber dam divides the tooth that is worked on and improved efficiency).
- Get a shade guide that will match the colour of the tooth you are working on and place varying shades of the composite resin on the dental tray setup or composite tray set-up along with a single-paste lightproof syringe and light-curing gun to harden the resin material.
- Put the mouth mirror, explorer and cotton pliers on the composite tray set-up ( dental tray is the basic tray setup for any dental procedure). Select the excavators and other hand cutting instruments (e.g. hoe or chisel), you can use these dental tools to remove any decayed tooth and smooth the area before any preparation.
- If needed, place a matrix band and wedge on the dental tray setup, along with Howe (#110) pliers for placing the wedge (the matrix band creates a temporary wall against which the composite resin can be placed, and the wedge positions the matrix band firmly). In addition, place 2-inch-by-2-inch alcohol gauze pads on the dental tray setup.
- Get the base, liner, primer, etchant and bonding materials and place on the dental tray setup. The liner and base protect the pulp of the tooth from dying (these parts the blood vessels and nerves), also the primer is a sealer that protects the tooth from hypersensitivity after the restoration. The etchant removes a thin layer of debris from the tooth in preparation for bonding, which restores protection to the tooth.
- Retrieve the finishing burs or diamonds for the high-speed handpiece, which is used to finish the composite resin restoration. Also, place medium disks and superfine disks for polishing the resin on the composite tray set-up, along with finishing strips for polishing spaces between teeth. Place a polishing paste and rubber cup on the tray setup.
- Place articulating paper and its holder on the composite tray set-up. It is used to check the patient’s bite after you put the composite resin.
Tip
Have a patient apron and chain ready and Get goggles to protect your patient’s eyes during the procedure. Plus, get your mask and gloves ready before you assist your dentist. You should get all these materials along when setting composite Tray set
Warnings
Get a surface disinfectant, towels and clean the place after the procedure is done successfully to prevent the spread of infection to one another.
RELATED READING
- Dental Amalgam tray set-up (Silver-Colored Dental Fillings)
- DENTAL TRAY SET-UP FOR CROWN PREP INSTRUMENTS
- 10 Basic Prophylaxis Tray Setup
- 12 Basic Suture Tray Setup & Wound Management
- 8 Oral Hygiene Tips for Healthy, White Teeth
- 7 Reasons Why Dental Cleanings Are Essential for Better Health
- Gigli saws and their uses
- Tenaculum forceps and their uses
- Sponge forceps and their uses
- Allis forceps and their uses
REFERENCES AND SOURCES
- The University of California, San Diego pre-dental society
- “Torres and Ehrlich Modern Dental Assisting;” Doni L. Bird, MA, and Debbie S. Robinson, MS; 2009