
The Simple Technique of Cleaning and Sterilizing Dental Instruments
Elimination of cross-infection is a significant responsibility for all healthcare employees. In dentistry, it’s accomplished by utilizing disposable things and ensuring all non-disposable instruments are correctly cleaned prior to being sterilized, preferably by autoclaving. The latest CDC Guidelines for Infection Control in Dental Health Care Settings– would be the standard of care for disease control in dentistry.
Why is it that we decontaminate things?
Decontamination is completed for 2 reasons:
- To Generate a reusable thing safe for others to Manage
- To minimize (disinfect) or remove (sterilize) the threat of cross-infection by immediate contact inside the dental office.
Definitions used in the content
Cleaning — bodily elimination but not the mandatory killing of germs.
Sterilization — some other procedure, chemical or physical, which will ruin all forms of life (like viruses, bacteria, viruses, and spores.
Disinfection — having a broker which destroys germs or other dangerous microbes or inactivates them, generally known to compounds that kill the growth (vegetative) types but not the resistant spores of germs
Procedures for dental instrument sterilization
Dental instruments which need heat sterilization (autoclave) process
- All stainless steel, tungsten carbide, and Teflon-coated dental hand tools
- All of burs and bur changers
- All of the orthodontic and endodontic and surgical tools
- Air-water syringe hints
- High-volume evacuator tips
- Dental surgical appliances
- Ultrasonic periodontal scalers and hints
- Electro-surgery hints
- Metallic perception trays
- Intra-oral radiographic equipment that can withstand heat sterilization
Dental instruments which need chemical sterilization process
- Metal or plastic spatulas
- Glass dappen dishes
- Vinyl or glass things not Supposed to be disposed of this Can’t withstand heat
- Mirrors for intra-oral photography
- Cheek retractors
- Handles for brush hints
1.Pre-sterilization cleanup of dental devices
How successful sterilization procedure can be determined by direct contact between the steam and all surfaces of these filthy instruments load, as remaining human cells, oil or other residues will stop contact between the vapor and the surfaces of the load. Contaminants that aren’t eliminated can become fixed into the instruments during sterilization making following removal harder. Therefore all things that meant for sterilization has to be clean and dry before putting them in the sterilizer chamber.
2. Automated versus manual cleaning
Instruments may be washed manually by hand or by machine employing an ultrasonic bath or a saline washer disinfector. Only those things incompatible with automatic washing needs to be confined to manual cleaning of tools. Staff security is improved as tools don’t have to be scrubbed, hence there’ll not be as much exposure to pathogenic germs, sharps accidents or hazardous substances. Overall effective is raised as additional time becomes available for clinical pursuits.
3. Preventing rust of instruments
Ideally, tools should be washed as soon as possible after use. Proteins in the bloodstream and saliva left over the device after therapy could be consumed and then secured onto the surface of the instrument. Finally, saliva and blood will rust stainless steel instruments, resulting in pitting and rusting of their face area. Damaged and pitted instruments are somewhat more challenging to clean efficiently and rust can decrease the lifespan of this tool.
4. Manual cleaning of instruments
 |
| Source: Freedentalce |
Before cleaning the tools, the team in-charge should wear the following protective clothing:
- Disposable apron/gown
- Face shield or face mask
- Household gloves
- When going from functioning in a specified dirty area into a clean place, change gloves and plastic sheeting and wash hands
Committed separate washing and washing deep sinks situated in a specified dirty zone.
- Utilize a non-foaming, neutral (pH5-9) detergent at a measured dose at a measured quantity of water. Don’t use washing-up liquid, that leaves a residue along with the surface foam since it hastens the visibility of sharp tools. Always take care of sharp tools.
- Utilize nylon brushes, not green pads or wire brushes. Cleaning equipment ought to be cleaned and cleaned (or rather use disposables) and kept dry between use. Brushes shouldn’t be kept in disinfectant solutions.
- Utilize non-shedding and disposable materials for drying and cleaning equipment.
- Fill a basin with lukewarm water (water warmer than 35 degrees Celsius will coagulate proteins and prevent their elimination )
- Fully immerse tools and wash under the waterline to decrease aerosol formation. Avoid scrubbing under water.
- Disassemble multi-part tools and listen to crevice joints and s of tools.
- Perform the last rinse under warm water to help device drying
- Dry tools to avoid carryover of polluted wash water to the sterilizer.
- Visually inspect tools for residual blood or debris following cleansing and repeat if needed.
5. Mechanical cleaning using an ultrasonic bath

Ultrasonic baths are a great way of cleaning complicated, jointed or serrated stainless steel in addition to metal tools and items which are heavily soiled, such as with cement. High-frequency sound waves which make areas of alternating low and high pressure in the tub creates cavitation that’s the base of the way ultrasonic cleaning functions. Bubbles form from the detergent under reduced pressure implode if the pressure varies from low to high, dislodging debris out of nooks and crannies of these tools thus cleansing the surface.
Plastic instruments aren’t successfully cleaned by this process since they consume the ultrasonic energy. Bear in mind that ultrasonic bathes are just clean and eliminate germs; they don’t disinfect tools since the conducting temperature is below the minimum needed to kill vegetative bacteria.
- The cleansing solutions from ultrasonic cleaners must be altered based on the manufacturer’s use directions. The cleaning room ought to be decontaminated while the remedy is changed.
- Place tools from the container and submerge from the cleanup solution. Fill out the skillet with just the suggested variety of tools.
- Cover the ultrasonic bath and procedure the tools to the time recommended by the manufacturer (normally 5 to 10 minutes).
- Eliminate the instrument container and wash thoroughly under warm water.
- Inspect the tools and initiate additional cleaning when the tools are still cluttered. If hand scrubbing is essential, scrubbing under warm water is done in order to decrease the production of splatter, spray, and aerosols.
- After rinsing, dry all instruments before packing for sterilization.
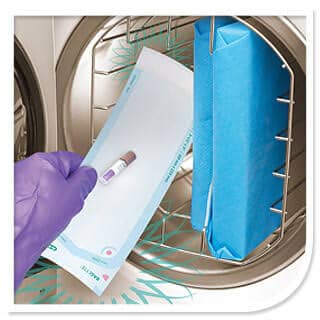
Sterilization of dental instruments
 |
| Autoclave |
After the conclusion of the decontamination procedure, dental instruments requiring sterilization ought to be processed by the process of selection dictated by the item or substance being sterilized. Heating stable dental tools shall be washed and sterilized before use by utilizing steam sterilization under pressure (autoclaving), dry heat, or chemical vapor. Food and Drug Administration (FDA) removed the usage of compound sterilants/disinfectants for sterilization of all heat-sensitive dental products.
Initiation of sterilization begins using packaging. dental containers or instruments of dental devices sterilized by means of a heating or vapor method will likely be packed or wrapped before sterilization if they’re not to be used promptly after being sterilized. These bundles or containers shall stay sealed unless the tools within these are put on a setup menu and coated with a moisture impervious barrier over the day the tools will be used and will be saved in a way in order to reduce contamination. Provisions have to be made for the materials to be eliminated without contamination, such as using gloves while handling these products.
Storage and care of sterile dental instruments
 |
| Source: Studio smile Thailand |
The disinfection and sterilization procedure is of little worth unless proper care is directed to the partitioning of sterile instruments.
- Storage areas must be dustproof, dry, well-ventilated and readily accessible for regular dental usage. Adequate space in racks and drawers should be accessible to permit for rotation of packs and bags so that the earliest items throughout the sterilization cycle would be the first used.
- Things should not be saved in almost any place where they can moist.
- Items must be placed so that packed items aren’t crushed, compressed, bent or punctured.
- Outdoor shipping containers and corrugated cartons shouldn’t be utilized as containers in storage locations.
- Wrapped sterilized objects must be put in storage areas, therefore, the tag and relationship entrance is easily observable and easily inventoried.
How disinfection and sterilization can fail
Frequent triggers of failure in disinfection and sterilization are:
- Inadequate preparatory steps prior to the decontamination and sterilization procedures are tried.
- Improper packaging, loading, and positioning of instruments from the cleaning and sterilization containers.
- Failure to time the period of cycles vulnerability properly.
- Lack of focus on the orderly, incremental arrangement in the operational methods.
- Struggling to comprehend the constraints, capabilities, and needs of the cleaning and sterilization arrangement required to achieve the complete objective.
- Insufficient focus on controls and details on storage and relationship of materials processed at a sterilization cycle.
Consideration for Appropriate sterilization
These factors must be considered:
- Intelligent, pain-staking attempts and professional area.
- Cleanliness of this substance’s surface being processed.
- Composition and temperament of this thing exposed to this process.
- Physical and chemical aspects in the surrounding environment or moderate being treated.
- Time the substance is subjected to some disinfection or sterilization representative.
- Shelf life, use lifestyle and reuse existence of disinfectant.
- Concentration and type of contaminant.
- Concentration and temperature of the gas or solution (chemical agent).
- Steam pressure and temperature.
- A decent drying cycle.
- A definite understanding and monitoring of this process by the consumers.
- Rinsing of tools sterilized by the liquid in sterile water.
- Drying of sterilized instruments in sterile towels.
- Suitable storage of sterilized instruments.
It’s actually a great and useful piece of information. I am glad that you shared this useful information with us. Please keep us up to date like this. Thanks for sharing.