This easy no-bake butterfinger pie is my favorite easy no-bake dessert recipe. It comes together in no time at all and is always a crowd-pleaser! An over-the-top ode to your favorite candy bar can be yours with a handful of simple ingredients and a few minutes of prep.
Quick Facts About Butterfinger Pie
Do you have any leftover Butterfingers from Halloween? If you're looking for a quick and easy no-bake dessert recipe to use them up, then look no further than this Butterfinger Pie! It has a chocolate Oreo cookie crust, creamy peanut butter Butterfinger filling, and is blanketed in a layer of silky chocolate ganache!1https://www.itisakeeper.com/4535/butterfinger-pie-easy-dessert-recipes/
Now, let’s go bake!
Butterfinger Pie – What’s it about?

This delicious, creamy Butterfinger Pie is the stuff of dreams. It's a no-bake dessert that's really simple to create. It's a terrific way to use up remaining candy and a perfect reason to buy more Butterfingers!
The butterfinger pie recipe in this article features a chocolate oreo crust that is filled with a luxurious and smooth mixture of peanut butter and crushed Butterfinger candy bars. Butterfinger candy bars can be a great addition to desserts and add a fun element to the flavors.
Not only are Butterfinger pies one of the most delicious treats ever, but they're also quite simple to smash, and once crushed, the amazing Butterfinger taste is readily disseminated throughout the whole dessert.
Every mouthful of our Butterfinger Pie is bursting with butterfinger deliciousness. And you'll want to take small bits! This delicacy is very rich, creamy, and sweet. A little amount makes a big difference. Yet it's difficult to avoid going back for seconds.
Nutritional Information of Butterfinger Pies – 8 Servings
- Calories: 143kcal
- Carbohydrates: 18g
- Protein: 1g
- Fat: 7g
- Saturated Fat: 1g
- Sodium: 134mg
- Potassium: 32mg
- Sugar: 5g
- Calcium: 8mg
- Iron: 0.7mg
Butterfinger Pie Recipe
- Prep Time: 45 minutes
- Cooking Time: 10 minutes
- Cooling Time: 4 hours
- Total: 4 hours 55 mins
- Servings: 8
Equipments & Kitchen Utensils Used: Bowls (large & small), teaspoons, food processor, sharp knife, fork, oven, freezer, measuring cup, handheld or electric mixer, cake plate, or serving board.
Ingredients
- 1 (8-ounce) of package cream cheese at room temperature
- ½ cup of creamy peanut butter
- 2 teaspoons of vanilla extract
- 1½ cups of powdered sugar
- 1 (12.5-ounce) bag of fun-sized butterfinger bars that have been crushed (reserve 2 bars to sprinkle on top)
- 1 (8-ounce) container of Cool Whip which has been thawed
- 1 store-bought oreo or chocolate graham cracker crust
Directions
- Heat oven to 450° F.

- Unroll 1 Pillsbury™ refrigerated pie crust in an ungreased 9-inch pie plate. Flute edges as desired; prick the bottom and side with a fork.2https://spicysouthernkitchen.com/butterfinger-pie/ Bake for 10 to 12 minutes or until light brown. Cool completely.
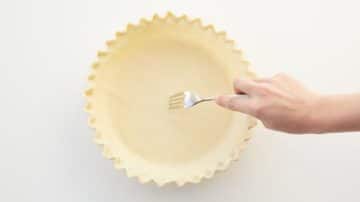
- Beat cream cheese and peanut butter with an electric mixer until smooth.
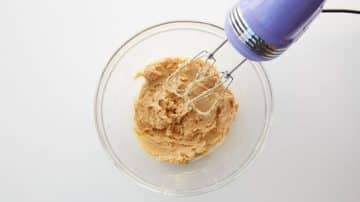
- Mix in vanilla.

- Beat in powdered sugar until smooth.
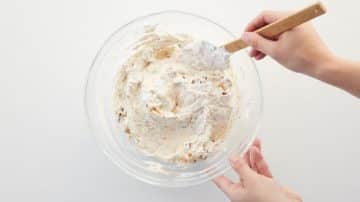
- Fold in crushed butterfingers.
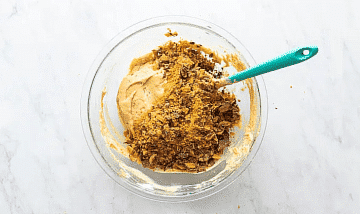
- Fold in Cool Whip.
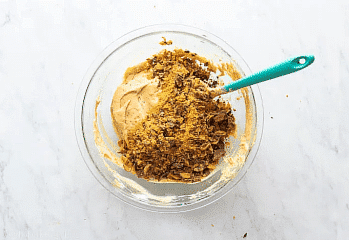
- Spread filling in the crust. Sprinkle reserved butterfingers on top.
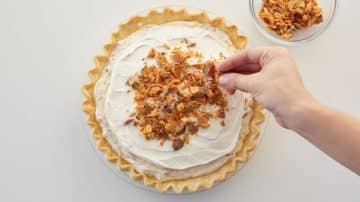
- Refrigerate at least 4 hours before serving.
Recipe Notes - Helpful Tips For The Best Butterfinger Pie
- Again, super important - do not use natural peanut butter. They tend to be too runny and will add too much loose oil to your filling.3https://www.pillsbury.com/recipes/easy-butterfinger-pie/ It is best to stick with the classic Jif or Skippy brand, creamy peanut butter; the kind where you scoop it out and it is thick and holds its shape on your spoon. It will keep your filling silky and light.
- Stick with semisweet or dark chocolate for the ganache layer. There is a lot of sweetness already packed into the crust, the filling, and the Butterfinger candy pieces, and you will need something to cut through all that sweetness. A darker chocolate will cut through that sugar and balance the dessert out nicely. I also recommend using high-quality chocolate. You can use Guittard chocolate chips for this recipe, but you can also use Ghirardelli brand chips or a bar of baking chocolate.
- Using a food processor to crush the Oreo pieces for the crust and to whip up the peanut butter filling is essential. Don't skip using it. For the cookie crust, using a food processor will ensure consistency and you won't get big chunks of Oreo. I also recommend using it to blend the cream cheese and peanut butter together for an ultra-smooth consistency. You can use an electric mixer to mix the filling but the food processor helps to ensure ultra-creamy smoothness!
- I know you might be tempted to skip adding the gelatin to the whipped cream, but don't! Your pie will turn into a gloppy mess with the weight of the peanut butter, cream cheese, and candy pieces. It may look fine when you add everything to the pan, but when you go to slice it, you will likely run into trouble. Plus, without the gelatin, you can't make this pie ahead of time.
- Don't overwhip the whipped cream. Stop once you see peaks but it's still pillowy soft. You can use fresh whipped cream instead of whipped topping. Use 3 to 4 cups of freshly whipped cream in the pie and another 1 to 2 cups for the topping.
- Substitute your favorite candy bar for the Butterfingers.
- When the time is ready to serve this pie, it helps to clean your knife after making each slice.
Butterfinger Pie - A Delicious Twist on a Classic Recipe
If you're looking for a delicious and unique dessert to impress your family and friends, look no further than Bluefinger pie. This twist on the classic blueberry pie is sure to be a hit with anyone who loves sweet, fruity flavors.
Bluefinger pie is a versatile dessert that can be served on any occasion, whether it's a family dinner, a holiday gathering, or a summer barbecue. It's easy to make, delicious to eat, and sure to impress. So why not give Bluefinger pie a try and see for yourself why it's becoming a new favorite in kitchens all around the world?
No baking. No muss. No-fuss. Just pure deliciousness, peanut butter, and butterfinger flavors! Oh, and if Butterfinger pies aren’t your thing, why not try Snickers? Or, Twix? Or, Milky Way? Any crushed candy bar works!
Frequently Asked Questions Concerning Butterfinger Pie
Can I Make Butterfinger Pie Gluten-Free?
Yes, the original Butterfinger candy is gluten-free. The only ingredient that contains gluten would be the cookies you choose for the crust, but you can substitute them with gluten-free chocolate cookies or sandwich cookies, or even gluten-free graham crackers.
Can You Chill This Pie For Longer Than 2 Hours?
Yes! Ideally, it must stay within two hours and be set up much better the next day.
Additional resources and citations
- 1
- 2https://spicysouthernkitchen.com/butterfinger-pie/
- 3https://www.pillsbury.com/recipes/easy-butterfinger-pie/
Butterfinger Pie | Get the Best Recipe on How to Make this Dessert with Step-to-Step Guide Pics, an Engaging Video Tutorial, and Expert Tips

This easy no-bake butterfinger pie is my favorite easy no-bake dessert recipe. It comes together in no time at all and is always a crowd-pleaser! An over-the-top ode to your favorite candy bar can be yours with a handful of simple ingredients and a few minutes of prep.
Type: Dessert
Cuisine: American
Keywords: Butterfinger Pie
Recipe Yield: 8
Calories: 143kcal
Preparation Time: 45M
Cooking Time:
10M
Cooling Time: 4H
Total Time: 4H55M
Recipe Ingredients:
- 1 (8-ounce) of package cream cheese at room temperature
- ½ cup of creamy peanut butter
- 2 teaspoons of vanilla extract
- 1½ cups of powdered sugar
- 1 (12.5-ounce) bag of fun-sized butterfinger bars that have been crushed (reserve 2 bars to sprinkle on top)
- 1 (8-ounce) container of Cool Whip which has been thawed
- 1 store-bought oreo or chocolate graham cracker crust
Recipe Instructions:
Step 2:
87
The content is intended to augment, not replace, information provided by your clinician. It is not intended nor implied to be a substitute for professional medical advice. Reading this information does not create or replace a doctor-patient relationship or consultation. If required, please contact your doctor or other health care provider to assist you to interpret any of this information, or in applying the information to your individual needs.

